Hi everyone, welcome back to my Construct 2 action adventure tutorial! Previously, we have made our character to move around the screen. But we can't call our game an action adventure without some action in it, right? So, this time we're gonna add some fight to our game.
Just like before, we're going to add some more animations to our character, this time it's attacking animations. So add three more animations: AttackUp, AttackRight, and AttackDown and then give each animations their respective attack frames from the clotharmor.png file that we have been using. There are five frames in the attacking animation.
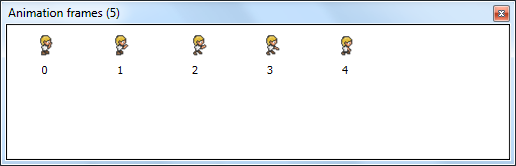 |
| Attack animation frames |
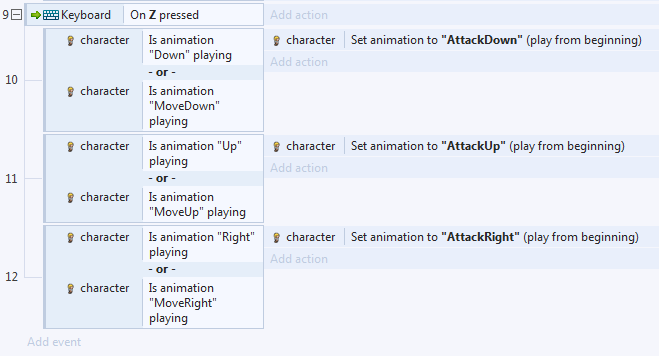
After that, we're going to play the animation by pressing a certain key on our keyboard according to which direction our character is facing. Let's make the "Z" key as our attack button. To play the attack animation according to our character's direction, we're gonna compare it with the currently running animation. If it's Up or MoveUp then we play the AttackUp animation, if it's Right or MoveRight then we play the AttackRight animation, and the same goes for the Down and MoveDown animation.
Alright, first make the event Keyboard On Z pressed just like what we did with other animations. Now I'm going to explain to you about sub-events. Sub-events are basically an event inside another event, these events (and its actions) are only run when its parent event's conditions are met. Parent events are the events from which sub-events are from. There's no limit on how many sub-events an event can have (sub-events can also have their own sub-events) but for readability's sake, it's not recommended to have too many sub-events.
To create sub-events, right click on the event you want to create sub-events from and choose Add -> sub-event. You can also press "S" on your keyboard as a shortcut.
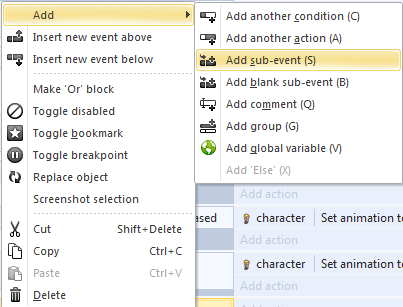 |
| Adding a sub-event |
After you create your sub-event, an Add event window will pop up. This is the same as when you're adding a normal event. For now we want to see if a certain animation is playing, so double click our character and then select the Is playing condition. After that an empty textbox will appear, enter it with the name of an animation we want to check, for now it's "Down".
We don't want to check for just a "Down" animation, but also a "MoveDown" animation. So right click on that sub-event we just create, go to Add -> Add another condition (the shortcut is "C" button). Adding a condition is similar to adding an event, but instead of making new events we're modifying an existing one. For now follow the same steps as before and check whether or not "MoveDown" animation is playing.
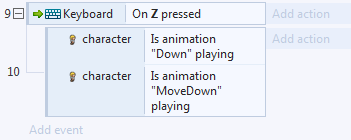 |
| Two conditions in an event |
This seems like what we want, but actually it's not. Because this sub-event will check if
both the "Down" and "MoveDown" animation is playing, which is impossible and not what we want. We only want to see if one of them are playing. How do we do this? By making this sub-event an "or" block. An "or" block is an event that only have to choose one of its all conditions to run its actions. Usually, an event have to meet all of its conditions to run its actions. Making an "or" block is simple, just right click on an event and select Make "or" block.
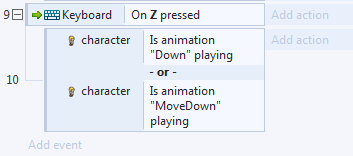 |
| An "or" block |
This will make the event to run its actions when at least one of its conditions is true. You can keep on adding more conditions to an event, there's no limit to how many conditions an event can have. For the action, we'll make our character play its AttackDown animation and that's it. Repeat this process for each directions.
 |
| Attack codes |
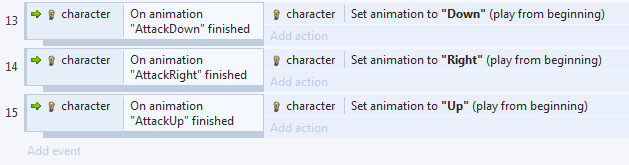
Try to run your game and you'll notice some strange things here: the weapon doesn't show up, the animations kinda slow, and when the character just stops at the end. We'll get to the weapon later, for now change all of the attack animation's speed to 15 (or however fast you want it). To make our character not just stop at the end, we'll change his animation when an animation ends.
To do this create a new event, choose our character and select the On finished event on the Animations section. In the next textbox you'll need to fill the name of animation that ends, make it "AttackDown". And for its action, we'll change our character's animation to "Down", repeat this for every direction.
 |
| Ending attack animation |
Run your game now, and you'll see that the attack animation has automatically changed to its idle animation. Now let's add our weapon! Insert a new sprite object and name it "axe". For our axe object, we'll use the spritesheet called axe.png from the same folder as our character's sprite, this is convenient as the order of the frames are exactly the same as the character, so we can match the two up.
Add animations to our axe, the same as our character with the corresponding frames. One more advantage is that the axe's size is also the same as our character so we can sorta "stick" them to make a good animation. To do this we're gonna add a new behavior to our axe called the "Pin" behavior. Add it as you did with our character, and then go to the event sheet.
We want to pin the axe at the beginning of the game / layout. So create a new event, double click the system object, and look for On start of layout event. For the action, double click the axe and select Pin to object. For the object, select our character and select done. Don't forget to place the axe on top of our character on the layout.
 |
| Pin the axe to character |
We're almost done! The last step is making sure that the axe's animation is the same as our character's. So, in every action where we change the character's animation, make the axe's animation the same. Don't forget to set mirror of the axe, as well. Run your project and you'll see that our character now wields axe and can swing it around! He's ready for adventure!
For next time, why don't we add enemies to slash our axe at? That sounds good. If you want to see the source code for this tutorial, you can download it from my Drive
here. If you like this tutorial and want to support me writing more of this, why don't you visit my
Patreon? 'Till next time!


Tidak ada komentar:
Posting Komentar